Attendance Tool Grading
There are two ways to enter grades in the Attendance tool: Manually and Automatically. The option you choose will depend on workflow preference and anticipated course needs. In general, manually entering grades offers more flexibility but does require grading each session. Automatic grading takes more time to configure but then becomes entirely hands-off, assuming no changes.
Manual Grading
Setup
-
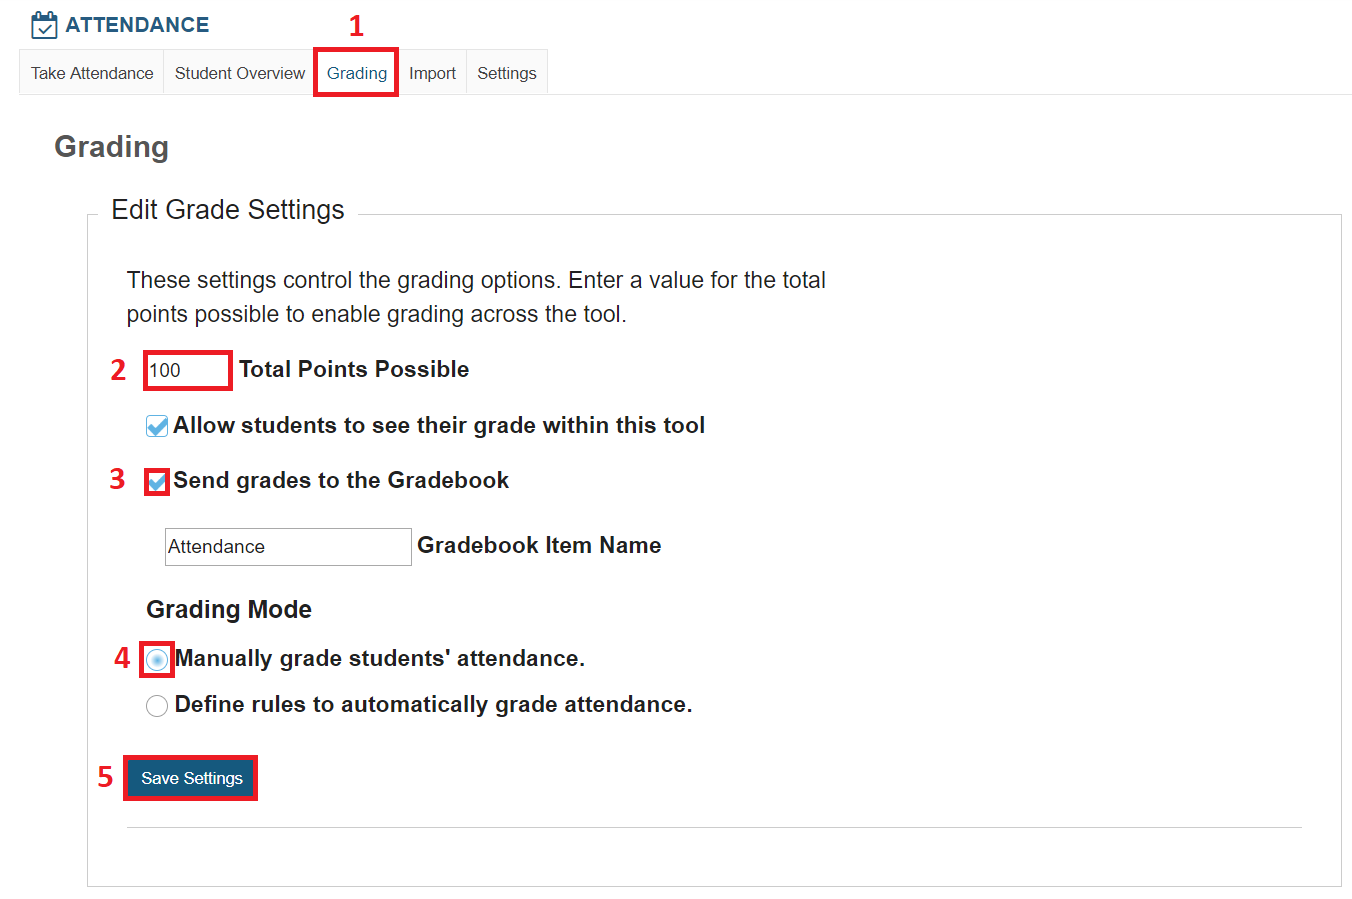
Click the Grading Tab
-
Enter the Total Points Possible (Note:This number represents the total Attendance score that students can earn in the course. The easiest option is to enter an Attendance point value of 10, 100 or the maximum number of points that students could earn for attending all classes. Alternatively, enter the total number of class sessions. For example, a class that meets once per week during a regular semester would have 16 class sessions = Total = 16.)
-
Check the box to Send grades to the Gradebook
-
Under Grading Mode, select Manually Grade students’ attendance
-
Click the Save Settings button
Create Attendance Items
If you have already created Attendance Items either by taking attendance in class or setting up the items ahead of time, please skip ahead to entering grades.
-
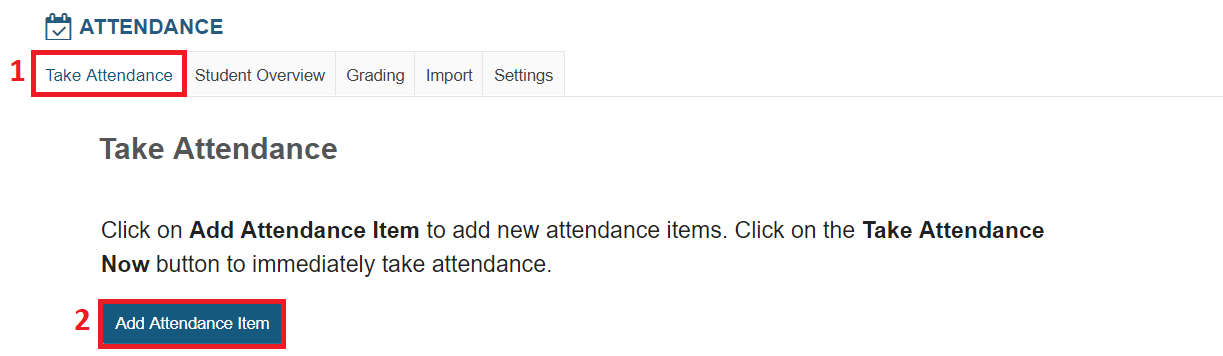
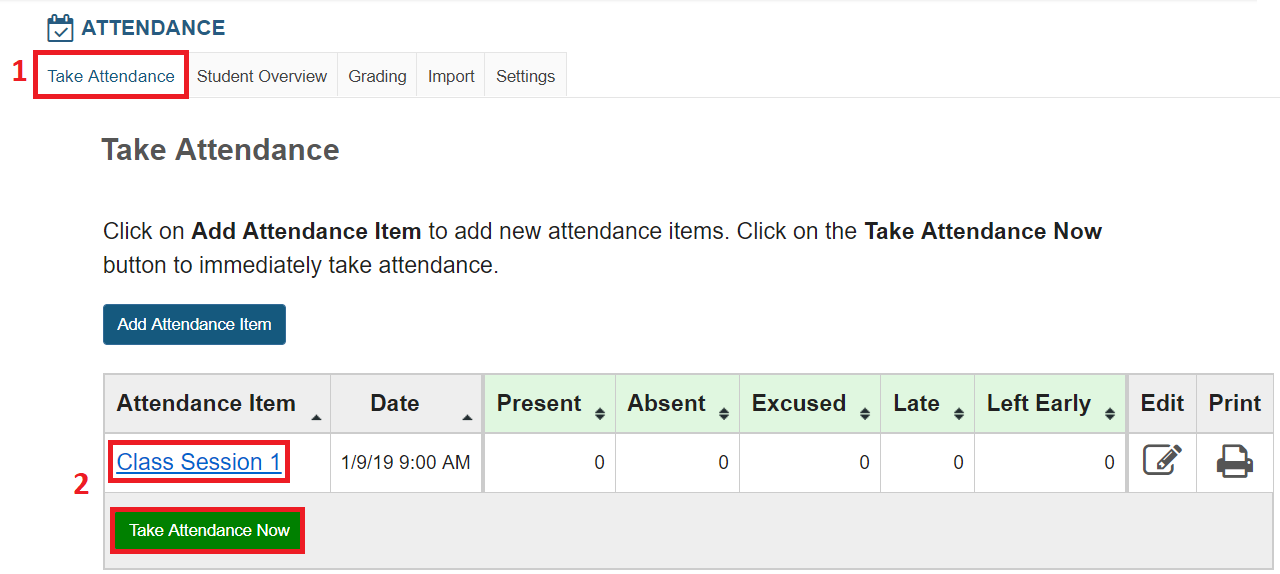
Click the Take Attendance tab
-
Click the Add Attendance Item button
-
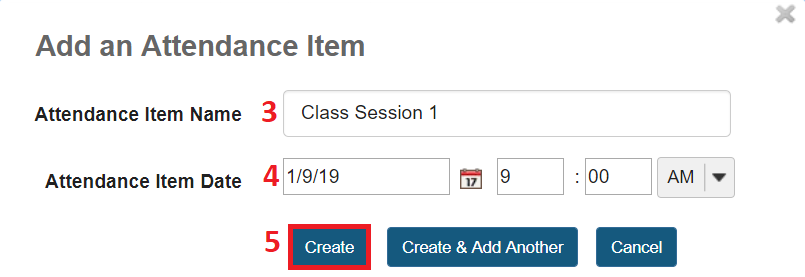
Enter the Attendance Item Name (e.g., Class Session 1)
-
Enter the Attendance Item Date and Time Tip: Including this information will ensure that attendance items display in chronological order
-
Click the Create & Add Another button Tip: Click Create instead to add items one at a time
-
Repeat this process to create an Attendance Item for each class session in the semester
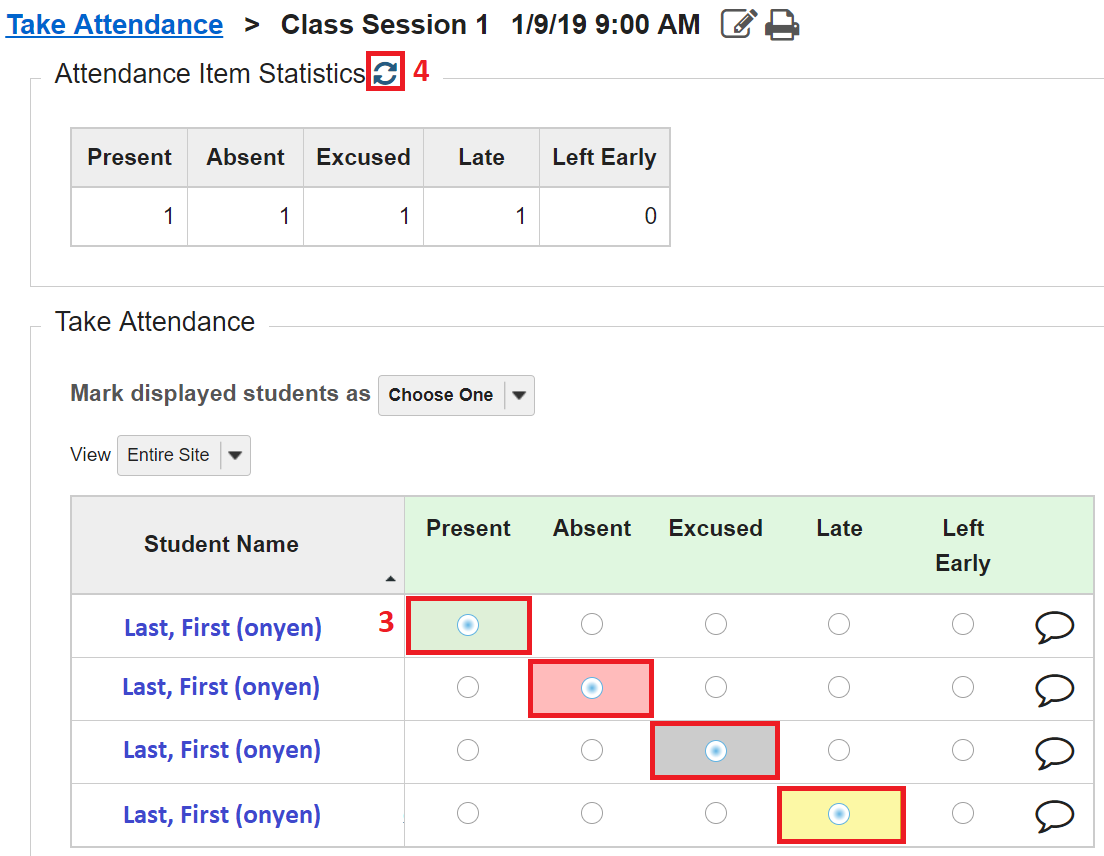
Take Attendance
Take attendance in class, either with a previously created Attendance Item or on the fly using the Take Attendance Now button.
-
Click Take Attendance tab
-
Click either an Attendance Item or the Take Attendance Now button
-
Click the grid to record the attendance status for each student
-
Click the update icon if statistics do not update automatically
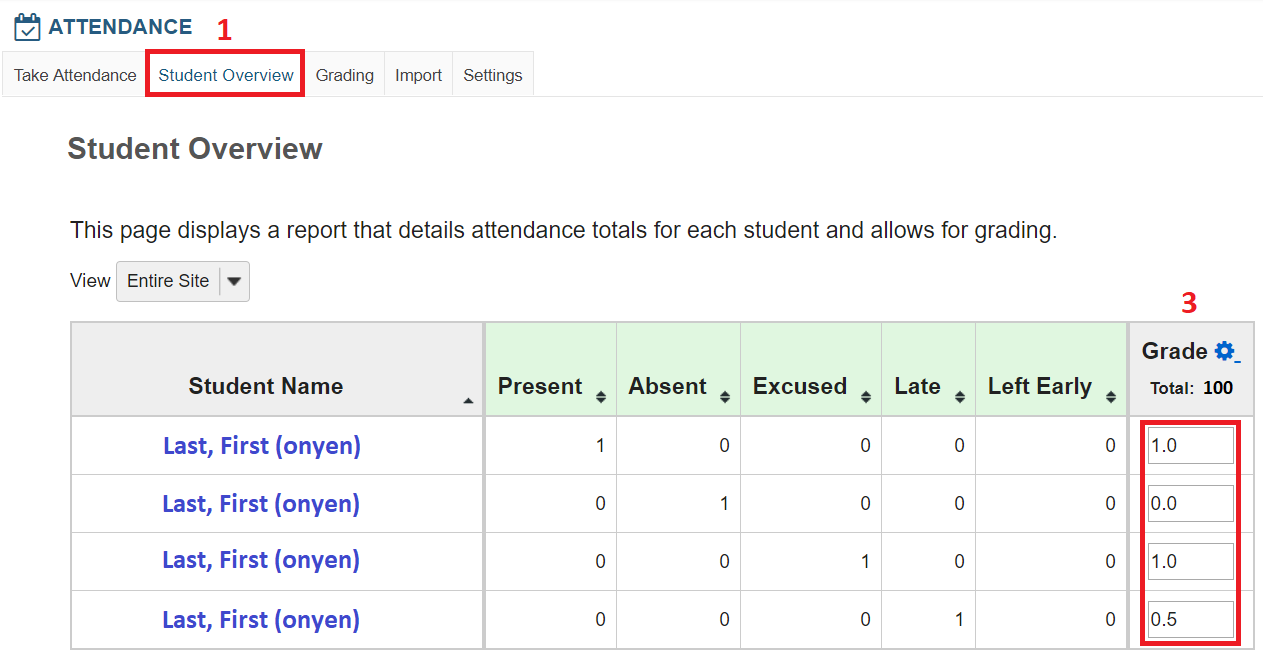
Enter Grades
After setting up grading preferences, creating attendance items and taking attendance, follow these steps to enter grades:
-
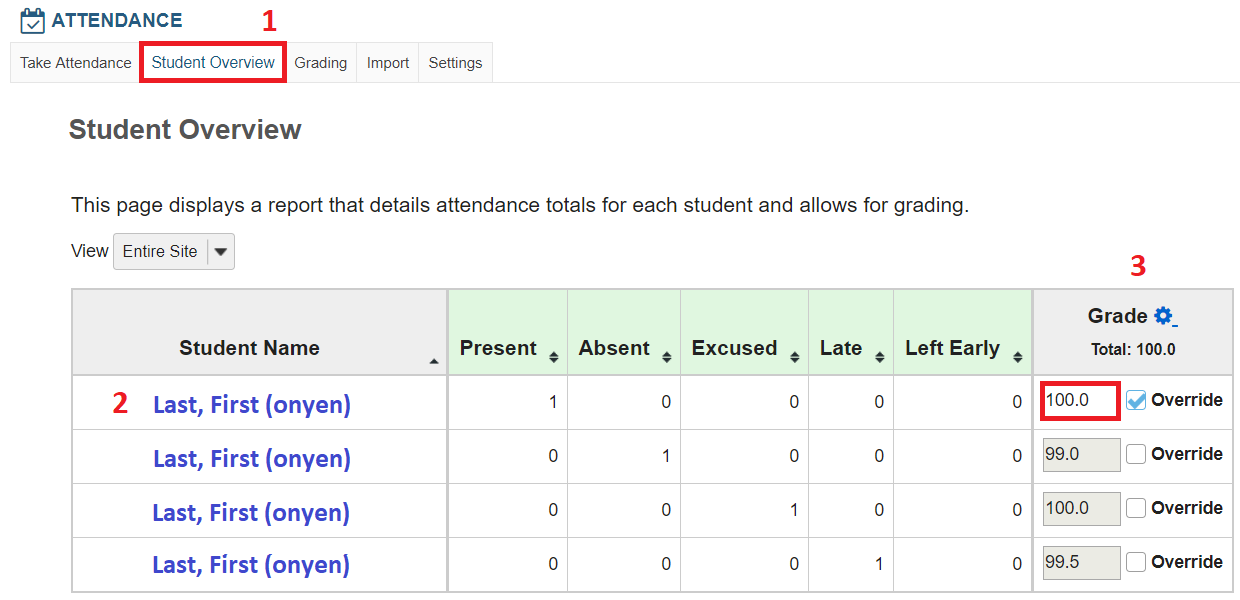
Click Student Overview tab
-
Review values in Present, Absent, Excused, Late and Left Early columns
-
In the Grade column, manually enter a grade for each student, noting the Total points possible
Automatic Grading
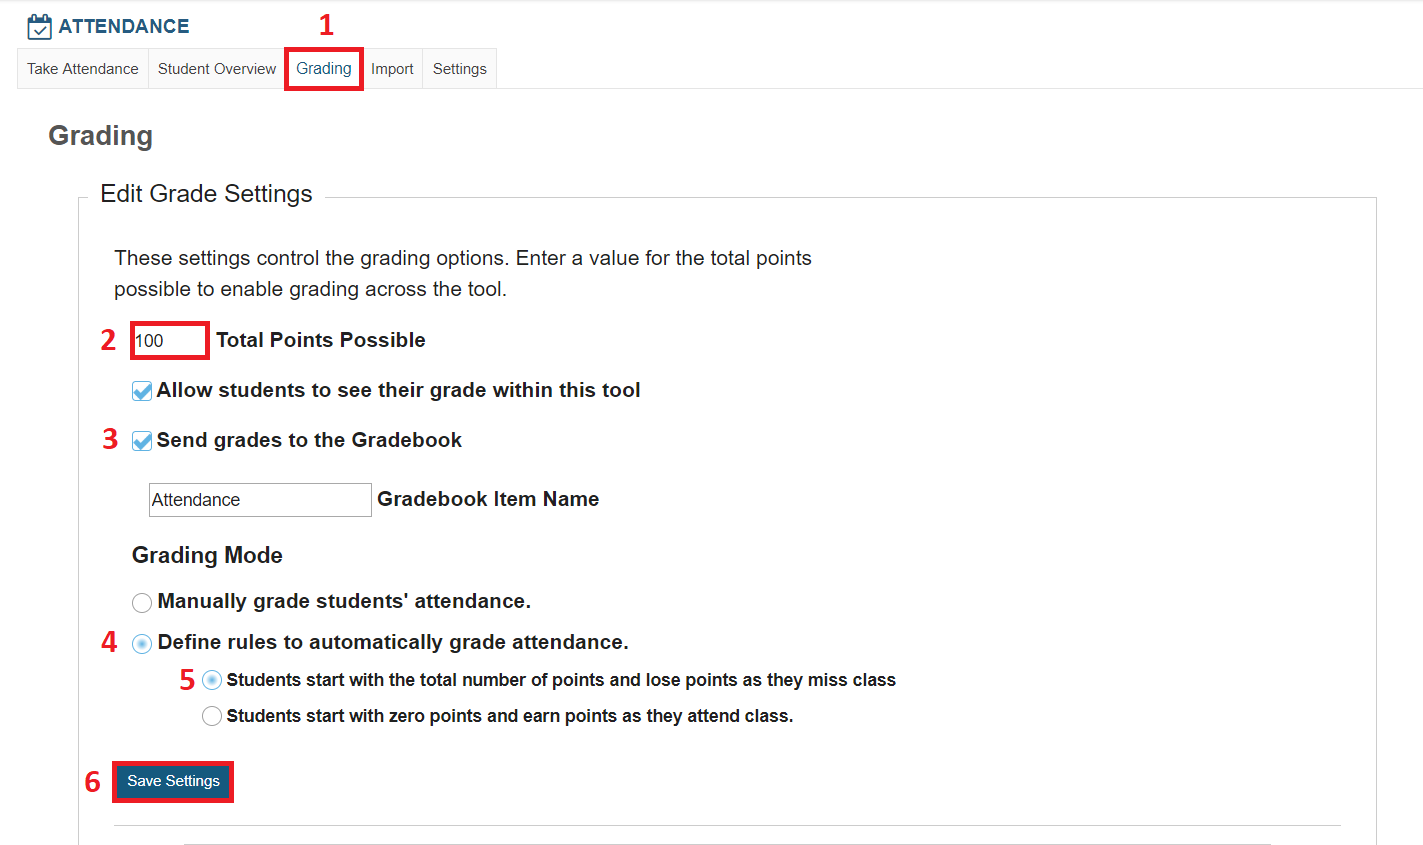
Setup
-
Click the Grading Tab
-
Enter the Total Points Possible Note:This number represents the total Attendance score that students can earn in the course. The easiest option is to enter an Attendance point value of 10, 100 or the maximum number of points that students could earn for attending all classes. (Alternatively, enter the total number of class sessions. For example, a class that meets once per week during a regular semester would have 16 class sessions = Total = 16.)
-
Check the box to send grades to the Gradebook
-
Under Grading Mode, select define rules to automatically grade attendance
-
Additional options will appear. Select the best fit for your course:
-
Students start with the total number of points and lose points as they miss class (Recommended)
-
Students start with zero points and earn points as they attend class
-
Click the Save Settings button
-
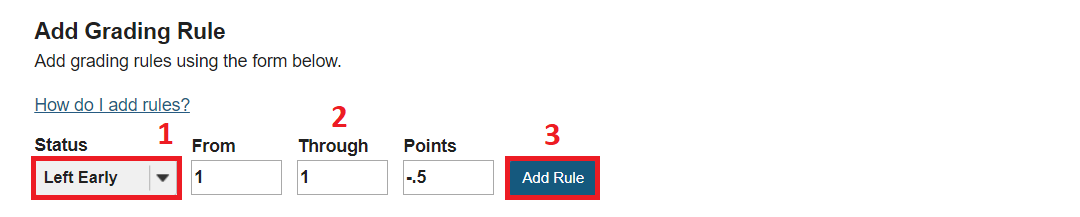
The Add Grading Rule panel will appear
Note: Grading Rules are required and must be written in the correct format so that the tool can calculate student attendance correctly. Please review the following scenarios and choose the option that best fits your course.
Scenario 1: Students start with Total, lose points for missing class (Recommended)
In this scenario, students do not earn points for attending class or having an excused absence. They lose points for being absent. If you prefer, partial points can be deducted as well for students arriving late and/or leaving early.
Absent

-
Under Status, select Absent from the drop down menu
-
Enter numbers into From Through and Points
-
Click the Add Rule button
-
Repeat the pattern below until a rule is added for the maximum number of absences permitted
|
Status |
From |
Through |
Points |
|
Absent |
1 |
1 |
-1 |
|
Absent |
2 |
2 |
-2 |
|
Absent |
3 |
3 |
-3 |
|
Absent |
4 |
4 |
-4 |
|
Absent |
5 |
5 |
-5 |
|
Etc. |
.... |
... |
... |
Late
If you track students arriving late and want to deduct partial points, add the following rules:

-
Under Status, select Late from the drop down menu
-
Enter numbers into From Through and Points
-
Click the Add Rule button
-
Repeat the pattern below until a rule is added for the maximum number of late entries permitted
|
Status |
From |
Through |
Points |
|
Late |
1 |
1 |
-.5 |
|
Late |
2 |
2 |
-1 |
|
Late |
3 |
3 |
-1.5 |
|
Late |
4 |
4 |
-2 |
|
Late |
5 |
5 |
-2.5 |
|
Etc. |
... |
... |
... |
Left Early
If you track students leaving early and want to deduct partial points, add the following rules:
-
Under Status, select Left Early from the drop down menu
-
Enter numbers into From Through and Points
-
Click the Add Rule button
-
Repeat the pattern below until a rule is added for the maximum number of left early entries permitted
|
Status |
From |
Through |
Points |
|
Left Early |
1 |
1 |
-.5 |
|
Left Early |
2 |
2 |
-1 |
|
Left Early |
3 |
3 |
-1.5 |
|
Left Early |
4 |
4 |
-2 |
|
Left Early |
5 |
5 |
-2.5 |
|
Etc. |
... |
... |
... |
Scenario 2: Students start at zero and earn points attending class
In this scenario, students start at zero and earn points for attending class and for having excused absences. They earn partial points for arriving late and/or leaving early. They do not lose points for being absent.
Note: This scenario is not recommended because it requires a rule for each attendance session. This process is time consuming but required so that students receive credit.
Present
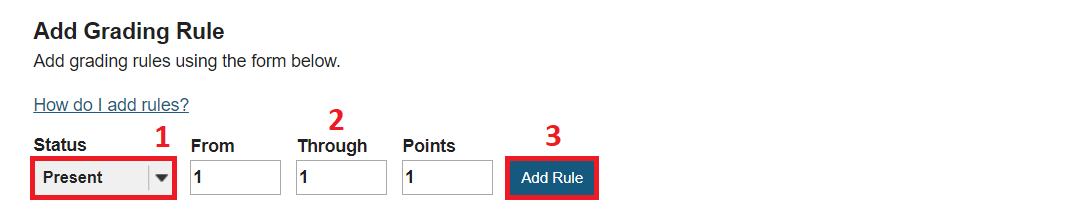
-
Under Status, select Present from the drop down menu
-
Enter numbers into From Through and Points
-
Click the Add Rule button
-
Repeat the pattern below until a rule is added for each class session
|
Status |
From |
Through |
Points |
|
Present |
1 |
1 |
1 |
|
Present |
2 |
2 |
2 |
|
Present |
3 |
3 |
3 |
|
Present |
4 |
4 |
4 |
|
Present |
5 |
5 |
5 |
|
Etc. |
... |
... |
... |
Excused
If Excused Absences are allowed in your class, include the following rules, up to the maximum number of excused sessions.
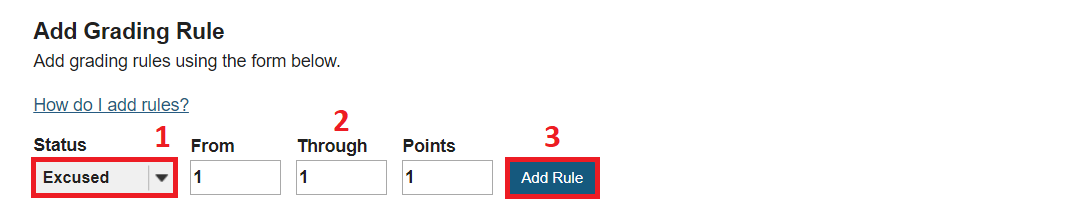
-
Under Status, select Excused from the drop down menu
-
Enter numbers into From Through and Points
-
Click the Add Rule button
-
Repeat the pattern below up to the maximum number of excused absences allowed
|
Status |
From |
Through |
Points |
|
Excused |
1 |
1 |
1 |
|
Excused |
2 |
2 |
2 |
|
Excused |
3 |
3 |
3 |
|
Excused |
4 |
4 |
4 |
|
Excused |
5 |
5 |
5 |
|
Etc. |
... |
... |
... |
Late
If you track students arriving late and want to award only partial credit for class time attended, add the following rules:
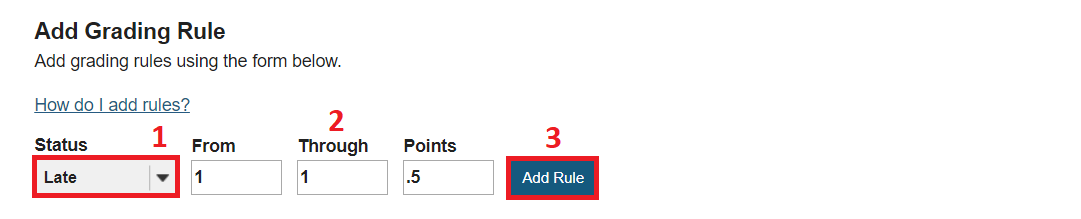
-
Under Status, select Late from the drop down menu
-
Enter numbers into From Through and Points
-
Click the Add Rule button
-
Repeat the pattern below until a rule is added for each class session or up to the maximum number of sessions where students are permitted to earn credit if arriving late
|
Status |
From |
Through |
Points |
|
Late |
1 |
1 |
.5 |
|
Late |
2 |
2 |
1 |
|
Late |
3 |
3 |
1.5 |
|
Late |
4 |
4 |
2 |
|
Late |
5 |
5 |
2.5 |
|
Etc. |
... |
... |
... |
Left Early
If you track students leaving early and want to award only partial credit for class time attended, add the following rules:
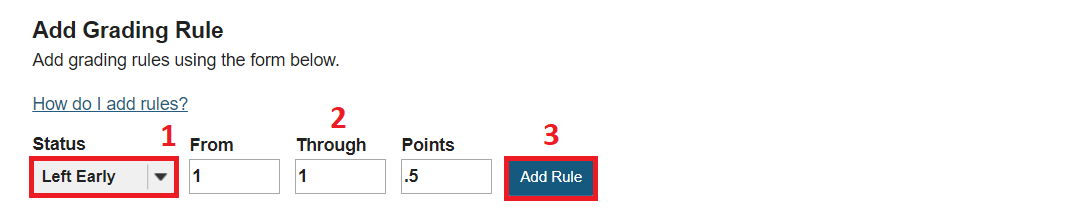
-
Under Status, select Left Early from the drop down menu
-
Enter numbers into From Through and Points
-
Click the Add Rule button
-
Repeat the pattern below until a rule is added for each class session or up to the maximum number of sessions where students can still earn credit if leaving early
|
Status |
From |
Through |
Points |
|
Left Early |
1 |
1 |
.5 |
|
Left Early |
2 |
2 |
1 |
|
Left Early |
3 |
3 |
1.5 |
|
Left Early |
4 |
4 |
2 |
|
Left Early |
5 |
5 |
2.5 |
|
Etc. |
... |
... |
... |
Create Attendance Items
If you have already created Attendance Items, either by taking attendance in class or setting up the items ahead of time, please skip ahead to instructions for entering grading
-
Click the Take Attendance tab
-
Click the Add Attendance Item button
-
Enter the Attendance Item Name (e.g., Class Session 1)
-
Enter the Attendance Item Date and Time. Tip: Including this information will ensure that attendance items display in chronological order.
-
Click the Create & Add Another button Tip: Click Create instead to add items one at a time. This can be helpful to keep track of which sessions have been added already.
-
Repeat this process to create an Attendance Item for each class session in the semester
Take Attendance
Take attendance in class, either with a previously created Attendance Item or on the fly using the Take Attendance Now button.
-
Click Take Attendance tab
-
Click either an Attendance Item or the Take Attendance Now button
-
Click the grid to record the attendance status for each student
-
Click the update icon if statistics do not update automatically
Enter Grades
After completing the attendance tool setup, creating attendance items, and taking attendance, grades should be calculated automatically. If selected, Grades will be sent to the Gradebook. To manually override a grade, follow these steps:
-
Click the Student Overview tab
-
Locate the student on the list
-
Under the Grade column, check the box next to Override
-
Enter a new grade into the box